MAIS / Progress / Concord
MAIS is the software running on a progress DB. Concord consultants is the old name of the company, now Temple Consulting. To create an AP Data file with MAIS, try the following:
Typically, one of these reports contains the information we require. You may need to add vendor info or other vital data (see below):
Report: M:\live\ap\aptaxalx.p From xPrint
AP Sales Tax Report (Amalgamated)
AND/OR
M:\live\ap\aptaxrpx.p
AP SALES TAX REPORT
If neither of these is available, you can use 'Report Builder' to create an A/P report with relative ease.
Report builder is a standard application bundled with MAIS, however you do have to pay for it and some entities do not have it. In which case the closest thing to what were looking for is the Paid Invoices Report, which unfortunately does not show GST amounts.
To create a custom report which does show gst, open report builder and create a new report, if it asks you if you want to create an instant report, click yes. Choose the table from which to create the report. If your installation of MAIS is using standard table names, the table name you want should be 'ap-inv.' Now select the fields to add to your report. You may simply add all available fields. We would like to see at least the following fields:
vend-no
inv-no
amt-full
amt-gst (sometimes known as amt-tax1)
amt-pst (sometimes known as amt-tax2)
amt-hst (sometimes known as amt-tax3)
descr
fisc-yr
inv-date
po-no
remarks[1]
use-gst (may or may not be used in their system)
entry-date
payee
Once you have enough fields, click ok. You can now click on the magnifying glass to preview the report. If the fields are squished together you can reduce the font size or change the spacing between the columns. It is important that there is enough spacing between the columns, as the example in the following screenshot shows:
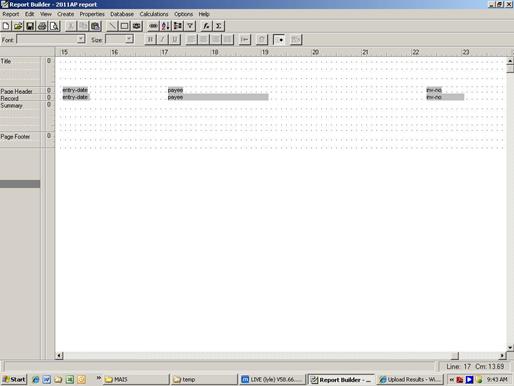
We also do have a Report Builder file (.PRL) available with the correct layout for the specific report. Please contact us if you require this file.
When you're happy with the report, go to Report -> Export and type in a fully qualified file name. (Include the path) So something like c:\temp\apreport.txt would be fine. Again, it is important to preview this file to make sure fields arent bunched together, if they are, you'll need to go back to the layout and spread them further apart.
On some systems the payee field ends up being blank, to alleviate this issue, one additional report is quite useful, from the table 'ap-master' just two fields; name and supplier-no.
Paid Invoices Report - Only used if previous report is not possible
If you cannot create a custom report, the following instructions can be followed for generating a Paid Invoices Report.
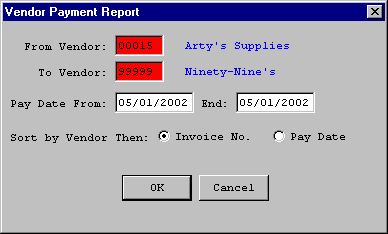
This report lists all paid invoices.
- From the MAIS Main Menu, select Accounts Payable Reports Paid Invoices. This will open a window called Vendor Payment Report (see figure below).
- In the From Vendor and To Vendor fields, enter the range of vendor numbers that you want to report on. You can press F3 or double-click on either of these fields to bring up a list of vendor numbers.
- In the Pay Date From and End fields, specify the range of dates that you want to include in your report. MAIS will only include those invoices that have been paid within this range of dates.
- Use the Sort by Vendor then radio buttons to determine how you want the report to be sorted. The report will be sorted by vendor number, and the invoices within each vendor record will be sorted according to the criterion you select here (Invoice No. or Pay Date).
- Click OK. This will open a window called Select Report Destination use this window to print, save or view the report (if you need assistance with this window, please refer to the Report Destination Window section in the Appendix).