SAGE
Sage 50 Instructions
Goto Reports - Transaction Details - Purchases
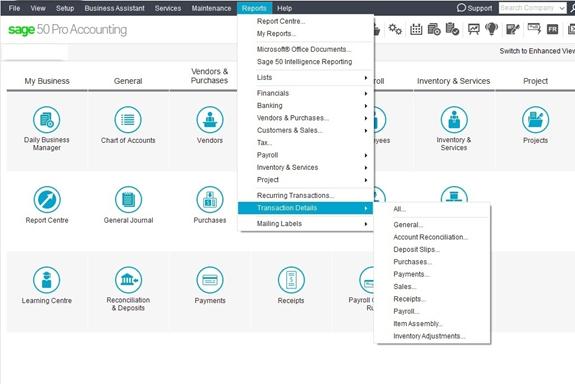
You can then run a report for each fiscal year and export to an Excel file.
Sage Intact Instructions
Under Reports Center -> All reports -> select application Accounts Payable -> Bills Analysis
Where you have the option, it's important to add All Transaction Details.
Select Export to export to a file type, such as PDF or Excel. The file can then be saved to your hard drive.
Sage 100c Instructions
We have two options for reports in this system
1. Under Accounts Payable Reports menu > Accounts Payable Invoice History Report.
This report is available only if the Track Detailed Invoice/Payment History check box is selected in Accounts Payable Options.
2. Under Accounts Payable Reports menu > Accounts Payable Invoice Register
Either report can be exported to Excel via selecting the following option in Printer/Output:
Select Export to export to a file type, such as PDF or Excel. The file can then be saved to your hard drive.
Sage 300 Instructions
You can skip the below instructions and run either (GLPJ03) or (APIPJ01) to a file or files if you've done this before.
By default, Sage outputs to your default printer, but we don't want to print this report, we want to save as a file.
Under the Home banner, Print Destination, you can select Printer, Preview, File or Email.
Select File. Then follow instructions below
When you "Print" the report, a dialogue will come up asking how you want to save the file. Choose
Either Microsoft Excel 2007 (XLSX) Data-Only - Defaults ok
Or Text (TXT), then OK and choose 40 characters per inch
General Ledger - G/L Reports - Posting Journals
This produces G/L Posting Journals - In Source and Functional Currency (GLPJ03)
Change:
Leave Date: as Document Date
From and To Posting Sequence. Try a small period first to see how your system handles it. This report can be large so don't try running the full Posting Sequence Period at first. You may need to run multiple reports in chunks of 100 or 1000 and often the first posting sequence is many years ago. We're looking for information for the last 4 years.
Select:
Reprint Previously Printed Journals
Include Trans. Optional fields
Currency: Source and Functional
Leave everything else as is:
Sort By: Posting Sequence
Run the Report and it will bring up a save to file dialogue. Repeat for addtional Posting Sequences. We'll want 4 years back from today's date.
Our instructions for Accpac may also work for Sage 300, so see them in the ACCPAC section of this document
Sage Other versions/Alternate Instructions
The Transaction Audit Trail report contains the information we are looking for.
There is a simple export option in Sage, the "Send To Excel" option.
This option should send the report you are currently viewing to an Excel Spreadsheet which you can then save/email to us.
From the main menu choose File-Send-Contents To Excel
OR
Look for the "Send To" button in the top Menu
The default options are fine for this process, so you can just press OK to the screens that come up.